Inkjet printers: Difference between revisions
m (→Summary) |
No edit summary |
||
| Line 1: | Line 1: | ||
Problems with ink jet printers are common and often result in their early disposal and replacement, given that they are sold so cheaply (with the cost recouped on ink sales). There is a range of things you can try before throwing your printer out, but better still, learn how to preserve it in good working order. | Problems with ink jet printers are common and often result in their early disposal and replacement, given that they are sold so cheaply (with the cost recouped on ink sales). There is a range of things you can try before throwing your printer out, but better still, learn how to preserve it in good working order. | ||
<div class="showtoc"> | |||
__TOC__ | |||
</div> | |||
==Summary== | ==Summary== | ||
Revision as of 10:16, 11 October 2022
Problems with ink jet printers are common and often result in their early disposal and replacement, given that they are sold so cheaply (with the cost recouped on ink sales). There is a range of things you can try before throwing your printer out, but better still, learn how to preserve it in good working order.
Summary
Inkjet printers like to be used regularly otherwise the inkjet nozzles can become clogged. If you are getting uneven printing, try the cleaning option, normally found under a Maintenance tab in the printer app, perhaps pausing between cycles for dried ink to soften. Unfortunately this uses a lot of ink which may soon become uneconomic. More radical solutions may be possible, but tend to be a last resort. Other problems such as paper mis-feeds can be caused by dirty or mis-aligned guides and rollers, or simply paper of poor quality or which has not been stored somewhere completely dry.
Many of the tips on this page are in fact more to do with preventing trouble than fixing it. As with all electronic equipment, check for the usual problems such as loose connections, broken leads, dead power supplies and signs of overheating.
The business model adopted by most manufacturers of inkjet printers is known as "two-part pricing": they virtually give away the printer and make their money on replacement ink cartridges. Unfortunately this means that it is very unlikely that a professional repair will be cost-effective for an inexpensive printer, except under warranty. It also creates a strong temptation to throw away your printer and buy a new one as soon as it starts playing up, adding to the problem of e-waste. Nevertheless, there are plenty of things you can do to preserve its life, to give you years of trouble-free service.
Use it or lose it
Inkjet printers love to be used. Left idle, the print head can dry out and become clogged, resulting in streaky printouts or one colour completely missing. It’s a good idea to print at least a few lines of text containing black and all three colours every couple of weeks. You can use the same sheet of paper at least four times by feeding it into the printer both ways up and both ways round.
You can help prevent the print head from drying out by keeping your printer away from sources of heat, such as above your computer, near a radiator, or in direct sunlight.
Switch your printer off after use, both to save electricity and to enable it to perform whatever power-on self-cleaning the manufacturer might recommend the next time you use it. But always switch it off by pressing its own power button as simply pulling the plug may leave it in an invalid state which it may have difficulty recovering from.
Some printer manufacturers use cartridges with built-in print heads, distinguishable by several dozen gold contacts on the cartridge. Despite being disposable, they might be a better bet in case of light use of a printer as a new cartridge comes with a new print head.
Some other printers have a print head assembly which is easily removed. If deep cleaning becomes necessary you might have more success with such a printer than one with a fixed print head.
Keeping clean
Once you start getting streaky prints, it’s time to act. Print quality may improve after a page or two, but if not, you need to run a cleaning cycle. Run the utility programme installed with the printer, or select "printer properties" from the printer icon and locate the "cleaning cycle". Follow it with a test print. In the same location you may also find a utility to align the print heads, which you can use if the three colours don’t quite line up. Sometimes, several cleaning cycles may be needed to get a satisfactory test print. Try leaving it for a while between cleaning cycles to allow dried-out ink time to soften. More than 3 cleaning cycles in a row may result in so much ink being used as to leave deposits on the head and making matters worse. At least try printing a couple of pages before any more cleaning cycles, assuming you have any ink left!
It has been suggested in relation to Epson printers that printing several pages full colour plus black on the "best photo" setting can be effective where cleaning cycles aren't as it helps the printer to expel any trapped air. This may work with other brands.
Unfortunately cleaning cycles use a lot of ink, and the cost of the cartridges might quite quickly mount up. If you already refill your own cartridges you can keep going more or less as long as you like, and maybe even try a flushing solution, but a refill starter kit and chip re-setter (essential for chipped cartridges) would go a good way towards the cost of a new printer.
Radical measures can be employed by the manufacturer such as removing the print head for deep cleaning or the use of flushing ink, but Advanced Servicing is kill-or-cure for the owner. Treat it as a learning exercise with a modest chance of a refurbished printer as a bonus.
Third-party and refilled-ink cartridges can save you money and be more environmentally friendly. Manufacturer’s branded ink is carefully formulated for its physical and chemical properties, but compatible ink quality varies. It's worth researching the best options for your specific printer model. A compromise might be to use branded ink during the warranty period but thereafter only for colour if you want top-quality colour photos. Refilling your own cartridges might be a viable proposition for heavy users, though there is an initial outlay, and you may in fact be better off with a budget laser printer.
When using refilled or compatible cartridges, you may receive premature "low-ink" warnings. You can probably ignore them if print quality is still good, but keep an eye on it. Some manufacturers chip their cartridges to discourage refilling or third-party alternatives. These can be distinguished by around half a dozen gold contacts on the cartridge. A "chip resetter" is available from various sources. This is an essential accessory if refilling your own chipped cartridges.
Last but not least, don't forget that you can save significant amounts of ink by printing in draft mode, and you can save paper by printing double-sided whenever possible. Many printers these days offer duplex mode and most others "manual duplex" mode, in which you return the paper to the input hopper to print the reverse sides. To avoid paper mis-feeds, ensure the ink is dry before printing the second sides.
Dealing with paper jams
Paper jams can be caused by poor quality paper. Paper should be stored flat and so as to keep it absolutely bone dry. Take care not to force anything when clearing a paper jam, but at the same time ensure there are no torn scraps left behind. An air duster may help. Also check that the rollers are clean. The printer maintenance options may include one for cleaning the rollers, or you can clean them with isopropyl alcohol and a cotton wool bud (assuming you can reach them), but take care not to leave any cotton wool on them.
Printers are sometimes jammed by foreign objects such as paper clips that have fallen into them. If it's not clear what's causing a jam, get a torch and really explore inside to see if you can find anything unexpected, or tip the printer upside down to see if anything falls out or rattles inside.
Software woes and strange errors
Software problems can best be tackled by checking the manufacturer’s site for driver updates, or by reinstalling the driver. Reboot between uninstalling and reinstalling. If you upgrade your computer and find there’s no driver for your printer, search online for possibly compatible drivers for newer printers of the same brand.
Finally, if a printer you’ve nurtured for years suddenly stops working and just flashes lights, it could be the so-called "kill chip". This is not actually a physical chip, but a function of the built-in control firmware which disables the printer once a non-user replaceable waste ink reservoir is deemed to have reached capacity. There are hacks online for resetting such a printer and prolonging its life for a while, but unless you can replace the reservoir yourself (probably a piece of absorbent material), it might get messy once it really is full. However, take care when downloading from hacking sites as they can be riddled with malware. Check whether others have had a good experience.
Advanced servicing
More advanced servicing is largely in the realm of "kill or cure", but if the alternative is recycling, then by all means have a go.
Blocked print head
Clogged print heads are probably the commonest reason for inkjet printers to be thrown away. Prevention is much better than cure but a cure may still be possible.
For printers having a fixed print head such as Epson there are cleaning kits available online. These consist of a bottle of cleaning fluid and a syringe fitted with a plastic tube. Or you can easily make up your own cleaning kit as described here.
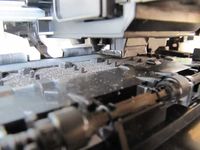
First, you need to move the print head carriage away from the rest position to enable you to work on it. This generally involves pulling the plug while the printer is initialising or printing. Now remove all the ink cartridges (wrap them in clingfilm to stop them drying out) and place some absorbent material beneath the print head. The syringe is then used to gently flush the ink path.
In some printers it may be possible to remove the print head from the carriage to enable you to soak it in cleaning fluid or isopropyl alcohol, but this will require you to disconnect a ribbon cable or cables and it's important that the connections remain clean.
Print head cleaning without a special kit may still be possible though the above method and the built-in cleaning cycle apply pressure to help dislodge deposits.
First, move the print head away from its rest position as above. You should now be able to slide the head over an absorbent pad soaked in cleaning fluid placed in its path. Different sources suggest window cleaning solution or isopropyl alcohol and which is best probably depends on the make of printer and the ink formulation. You will probably need to leave it some while to soften or disolve the blockages and follow up with one or more cleaning cycles.
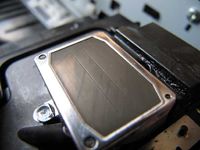
Since you will be unable to see what you're trying to clean, a photo shows the underside of a print head removed from the printer. The actual ink jets are microscopic. (This printer was already a write-off; considerable skill and possibly specialised jigs and alignment procedures would be required to completely remove a print head and subsequently reinstall it.)
This guide gives several techniques for cleaning a blocked Epson print head which may be worth trying.
Waste ink reservoir
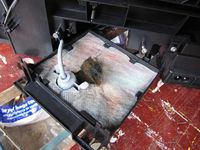
Replacing the waste ink collection reservoir in the case of a printer that has been rescued from the "kill chip" should be feasible. Removal of the entire print mechanism from the outer casing may be necessary, as in the case of the Epson all-in-one, illustrated. In this printer, a plastic tube took the waste ink from a small collection reservoir beneath the rest position of the print head to a separate much larger reservoir. This was retained by two screws and contained a thick pad of felt (one section shown lifted), which should be quite easily replaceable. The ink was helped on its way by a peristaltic pump, driven by the paper feed mechanism.
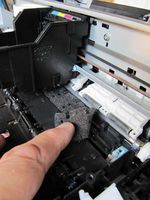
Look out for an additional waste ink reservoir under the paper path. This collects any ink if the paper has failed to feed. On the illustrated printer there was a small white felt pad beneath each end of a foam strip, (shown lifted). Don't mistake this waste ink reservoir for the main one. It may be necessary to move the print head manually it order to gain access to both ends. This is not normally recommended, but there may be no option. Finding which lever to press in order to release the print head can be tricky.
External links
- How to mend ... an inkjet printer, The Guardian, Monday 7 July 2014


