Yes, you can fix your laptop!/fr: Difference between revisions
(Created page with "Oui, vous pouvez réparer votre ordinateur portable !") |
(Created page with "La plupart des ordinateurs portables traditionnels "à clapet" sont relativement simples à démonter et à réparer. Bien qu'ils ne contiennent pas autant de pièces standard qu'un ordinateur de bureau, la plupart peuvent être remplacées et certaines peuvent être upgradées.") |
||
| Line 1: | Line 1: | ||
<languages/> | <languages/> | ||
La réparation d'un PC portable n'est pas aussi effrayante que vous pourriez le penser. Voici ce que vous pouvez espérer faire et comment vous y prendre. | |||
<div class="showtoc"> | <div class="showtoc"> | ||
__TOC__ | __TOC__ | ||
</div> | </div> | ||
==Résumé== | |||
= | |||
La plupart des ordinateurs portables traditionnels "à clapet" sont relativement simples à démonter et à réparer. Bien qu'ils ne contiennent pas autant de pièces standard qu'un ordinateur de bureau, la plupart peuvent être remplacées et certaines peuvent être upgradées. | |||
Si vous décidez qu'un ordinateur portable ne peut plus être réparé, il est toujours possible de réutiliser certains de ses composants. | |||
Malheureusement, les nouveaux ordinateurs portables ultra-fins offrent moins de possibilités et certains sont pratiquement irréparables. | |||
===Sécurité=== | |||
=== | |||
[[File:Warning03.png|30px|left]] | [[File:Warning03.png|30px|left]] | ||
:: | ::Sauvegardez les données importantes avant de commencer. Même si les choses ne se passent pas souvent mal, il convient de ne pas encourir de risques. | ||
::Avant de commencer à travailler, coupez le courant et retirez la batterie amovible s'il y en a une. | |||
:: | |||
::Déterminez si vous devez prendre des précautions [[Special:MyLanguage/Electrostatic Discharge Precautions|antistatiques]]. Les brosses et les aspirateurs peuvent créer de l'électricité statique. | |||
:: | |||
==Avant de commencer== | |||
= | |||
Pour toutes les tâches, sauf les plus élémentaires, la première chose à faire est de rechercher un guide ou une vidéo de réparation ou de démontage de votre modèle en ligne. L'un des meilleurs endroits où chercher est iFixit.com mais un moteur de recherche en donnera d'autres. De nombreux ordinateurs portables existent en plusieurs versions, donc si vous ne trouvez pas votre modèle précis, cherchez dans les guides ce qui s'en rapproche le plus et vous aurez une très bonne idée de la marche à suivre. | |||
Les seuls outils dont vous aurez normalement besoin sont un jeu de petits tournevis et un outil à levier, par exemple, un outil à lame fine pour ouvrir les clips nécessaires au maintien du boîtier. Le Jimmy d'iFixit est idéal. Les [https://eustore.ifixit.com/collections/prying-opening plastic spudgers] font également un bon travail, sans endommager le plastique de votre machine. Un couteau, de préférence avec une lame fine et un bout rond et peu tranchant fera l'affaire si vous n'avez rien d'autre. | |||
Pour les tâches de niveau intermédiaire, vous aurez également besoin d'un moyen d'organiser les vis. Les boîtes à pilules sont un excellent choix mais les boîtes à œufs feront l'affaire. Veillez à noter, pour chaque compartiment, de quelle étape de démontage proviennent les vis. Vous pensez que vous vous en souviendrez, mais croyez-moi, ce ne sera pas le cas ! | |||
Une autre bonne solution consiste à coller les vis sur une feuille de papier avec de la patafix (ou blu tack). Tant que vous n'utilisez que la moitié de la feuille, vous pourrez la plier afin de garder les vis en sécurité si vous terminez votre travail plus tard. Inscrivez l'étape du démontage ou l'endroit d'où proviennent les vis à côté de chaque boule de patafix. Lors du remontage, si la colle adhère trop aux filets des vis, il est possible de l'enlever en les tamponnant avec un autre morceau de patafix : la patafix colle mieux à la patafix qu'aux vis. | |||
<div lang="en" dir="ltr" class="mw-content-ltr"> | <div lang="en" dir="ltr" class="mw-content-ltr"> | ||
Revision as of 08:56, 9 March 2023
La réparation d'un PC portable n'est pas aussi effrayante que vous pourriez le penser. Voici ce que vous pouvez espérer faire et comment vous y prendre.
Résumé
La plupart des ordinateurs portables traditionnels "à clapet" sont relativement simples à démonter et à réparer. Bien qu'ils ne contiennent pas autant de pièces standard qu'un ordinateur de bureau, la plupart peuvent être remplacées et certaines peuvent être upgradées.
Si vous décidez qu'un ordinateur portable ne peut plus être réparé, il est toujours possible de réutiliser certains de ses composants.
Malheureusement, les nouveaux ordinateurs portables ultra-fins offrent moins de possibilités et certains sont pratiquement irréparables.
Sécurité
- Sauvegardez les données importantes avant de commencer. Même si les choses ne se passent pas souvent mal, il convient de ne pas encourir de risques.
- Avant de commencer à travailler, coupez le courant et retirez la batterie amovible s'il y en a une.
- Déterminez si vous devez prendre des précautions antistatiques. Les brosses et les aspirateurs peuvent créer de l'électricité statique.
Avant de commencer
Pour toutes les tâches, sauf les plus élémentaires, la première chose à faire est de rechercher un guide ou une vidéo de réparation ou de démontage de votre modèle en ligne. L'un des meilleurs endroits où chercher est iFixit.com mais un moteur de recherche en donnera d'autres. De nombreux ordinateurs portables existent en plusieurs versions, donc si vous ne trouvez pas votre modèle précis, cherchez dans les guides ce qui s'en rapproche le plus et vous aurez une très bonne idée de la marche à suivre.
Les seuls outils dont vous aurez normalement besoin sont un jeu de petits tournevis et un outil à levier, par exemple, un outil à lame fine pour ouvrir les clips nécessaires au maintien du boîtier. Le Jimmy d'iFixit est idéal. Les plastic spudgers font également un bon travail, sans endommager le plastique de votre machine. Un couteau, de préférence avec une lame fine et un bout rond et peu tranchant fera l'affaire si vous n'avez rien d'autre.
Pour les tâches de niveau intermédiaire, vous aurez également besoin d'un moyen d'organiser les vis. Les boîtes à pilules sont un excellent choix mais les boîtes à œufs feront l'affaire. Veillez à noter, pour chaque compartiment, de quelle étape de démontage proviennent les vis. Vous pensez que vous vous en souviendrez, mais croyez-moi, ce ne sera pas le cas !
Une autre bonne solution consiste à coller les vis sur une feuille de papier avec de la patafix (ou blu tack). Tant que vous n'utilisez que la moitié de la feuille, vous pourrez la plier afin de garder les vis en sécurité si vous terminez votre travail plus tard. Inscrivez l'étape du démontage ou l'endroit d'où proviennent les vis à côté de chaque boule de patafix. Lors du remontage, si la colle adhère trop aux filets des vis, il est possible de l'enlever en les tamponnant avec un autre morceau de patafix : la patafix colle mieux à la patafix qu'aux vis.
Sometimes you will find arrows against some of the screws on the base of a laptop or on a motherboard. These are the screws to undo; leave any others, at least for the time being.
If the laptop case won't come apart, remember, there's always one more screw! If for instance you can ease it apart by a centimetre or two on the left side but only by a few millimetres on the right, the remaining screw is almost certainly close to the right hand side.
On reassembly you may sometimes find at a certain step you have more holes than screws to go in them. This will be because the other holes are for screws to hold the case on. If you put screws in those holes now you'll have a problem later. A good disassembly guide will make this clear.
What can you do?
In the case of traditional clamshell laptops, many are similar in construction, though some you open from the top and others from the bottom. More modern ultra-thin and convertible laptops tend to be simpler in construction but not necessarily easier to take apart. In particular:
- Some are glued together and almost impossible to repair whereas with others simply removing the back gives access to the motherboard and main components.
- Batteries tend not to be user-replaceable but built-in. They are custom assemblies shaped to fit within the laptop case rather than made out of standard cylindrical lithium cells.
- The keyboard may be built into the case top and the RAM soldered directly to the motherboard making them much harder to replace.
The various tasks you can undertake are listed below, grouped roughly according to difficulty for a typical clamshell laptop. That said, what's easy on one laptop can require extensive disassembly on another, or vice versa.
Easy
Battery removal or replacement
Many laptops allow you to remove the battery simply by releasing a couple of catches. Often, one is spring loaded. With newer ultra-thin and convertible laptops you will probably need to remove the case back. Look for an online guide to show you how.
Unfortunately, sourcing replacement batteries is something of a minefield. Genuine manufacturer's batteries tend to be outrageously expensive, and if they have been sitting on a shelf for several years they may already be losing capacity. After market batteries may or may not be worth the money and may even be pulled from scrap laptops. Some are re-manufactured using fresh cells, which is fine so long as the smart controller within them has been reset. Other things being equal, a mid-price battery could be a good choice. To protect yourself:
- Check the vendor's warranty period and returns policy.
- Check the vendor's reputation and other purchasers' experience on independent review sites such as Trustpilot. Be aware that favourable reviews can be bought.
- When the battery arrives, check whether you are required to register a warranty for it to be valid, though under consumer law this should not be necessary.
Batteries for ultra-thin and convertible laptops are harder to replace and may be harder to source.
RAM replacement or upgrade
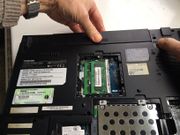
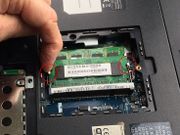
Upgrading your RAM (main working memory) is probably the easiest upgrade you can do, and at the same time, often one of the most effective. You can usually access the RAM slots simply by removing a service cover on the base. Two clips, one either side, hold each memory module in its slot. On replacement, ensure the memory module is seated as far as it will go in the connector before angling it down to engage the clips.
If your laptop has a 32 bit processor or runs a 32 bit version of Windows and has less than 4GB of RAM, then upgrading to 4GB (the maximum it can use) is generally well worth while and relatively inexpensive.
(If you're not sure whether your laptop is 32 or 64 bit, press the Windows key and "R" and type msinfo32. Press Return. A complete run-down of your computer's resources will be given.)
Upgrading a 64 bit laptop beyond 4GB may well be worthwhile, particularly if you do graphics, video or audio editing, or commonly have many browser tabs open.
Replacement of a damaged or faulty keyboard
Many people put up with a damaged or unreliable keyboard without realising just how cheap and easy it might be to replace.
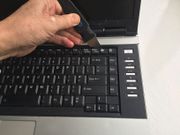
Search for an online guide. Quite commonly, all you have to do is release a series of catches along one long edge of the keyboard in order to lift it out. A ribbon cable will still be connecting it to the motherboard, and you can release this by carefully lifting or releasing a clamping bar. (See Ribbon Connectors.)
On some laptops the keyboard is additionally held in place by one or more screws which you have to unscrew from the bottom of the case, or hidden under a snap-on bezel between the keyboard and screen. On others, the keyboard is integral with the case top, but still not that hard to remove.
Replacement keyboards for most models of laptop are available online for around £20. Make sure you get one for your exact model. Also, make sure you get one with the right national keyboard layout, otherwise you may find some keys in unfamiliar places.
Hard disk replacement or upgrade
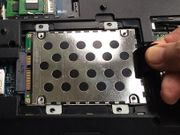
Very often you can access the hard disk simply by removing a service cover on the base. On some laptops, particularly consumer grade ones, a first level of disassembly may be required.
Replacing a hard disk with a solid state disk is probably the most effective way of injecting new life into an old laptop. But if it's running slowly because of unwanted software, pop-ups or viruses then you should tackle those first.
If you are running out of storage space then fitting a larger hard disk is easy. Laptop hard disks are highly standardised in size though they do come in several different heights. If you are fitting one with a higher capacity, check that it's no thicker than the old one.
If you're happy to reinstall your operating system on your new disk then that's the easiest way to go. To copy your existing system you will need appropriate disk cloning software. Copying a hard disk to a smaller SSD requires an extra step to shrink the file system.
CD/DVD drive replacement
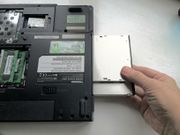
A faulty CD/DVD drive is easily replaced, or you might wish to replace it with a better one, or a Blu-ray drive. They are all a standard size, but come in a couple of different heights.
The CD/DVD drive normally just slides into the laptop shell, but it's retained by a screw at the back, somewhere around the middle of the laptop. Quite often you will be able to remove this screw with no more disassembly than removing the service cover on the bottom.
The drive will usually have a bezel which is shaped and styled to match the laptop, and this can be unclipped and transferred to a new drive.
Just a little harder
Replacing the WiFi adapter
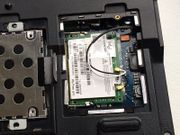
WiFi is supposed to be standardised, but nevertheless a particular brand of adapter will sometimes refuse to work reliably with a particular router. The WiFi adapter is often a small easily replaceable board.
It may be very easily accessible along with the RAM and the hard disk under a service cover on the bottom of the case. Gently lift off the two antenna connectors and remove one or two screws holding it in place, then remove the adapter from the socket it fits in, which similar to a RAM socket but smaller.
On some laptops the WiFi adapter may not be quite so easily accessed, requiring a first level of disassembly.
Cleaning the fan
After a few years it's very common for the fan (or more usually the cooling fins) to get clogged with matted dust. This will cause the laptop to overheat, the fan to run continuously and perhaps noisily, and may cause the laptop to crash.
Cleaning the fan is not difficult but usually requires fairly extensive disassembly of the laptop, which may be daunting. Don't be put off. Given a good disassembly guide, this is perfectly doable.
Replacing the power connector
A damaged power connector which no longer connects reliably is not uncommon. In many cases it's replaceable. As with cleaning the fan, this is likely to require fairly extensive disassembly but often, the power connector itself is easily removed from the case and simply plugs into the motherboard via a flying lead.
If you're unlucky you may find the power connector is soldered directly to the motherboard, in which case you will need to be confident with a soldering iron to replace it. Or you might find the problem is that the laptop case is broken around the power connector so that you can't push the plug fully home.
Replacing the backup battery
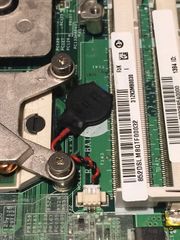
All laptops contain a small backup battery, often (for historical reasons) erroneously called the CMOS battery. This keeps the clock running when neither mains power nor a main battery are present. (Removing this battery will not reset the BIOS settings and BIOS password as sometimes thought. These have been held in flash memory similar to a memory stick in all computers since about the 1990's.)
This battery is usually a non-rechargeable lithium coin cell, or sometimes a rechargeable nickel battery in a plastic sleeve. Either way it may fail after maybe 10 years or more causing the computer to lose its time and date on loss of power. If you're lucky, it will be on a flying lead connected to the motherboard via a miniature plug and socket, or it might be a coin cell in a socket. Otherwise it could be soldered in and a certain level of disassembly may be required to access it. If you can't get hold of an identical replacement, provided it's the same voltage and the same chemistry it should be fine. If you need to improvise at all, make sure you get a "tagged" battery having tags spot-welded to it which you can solder to. It's not possible to solder directly to a battery of any type without damaging it.
More difficult
Fixing a broken hinge
A broken laptop hinge is a very common problem. Unfortunately it's nearly always the plastic the hinge is attached to that is broken rather than the hinge itself. The hinge screws usually screw into brass bushes set in plastic pillars which are part of the case moulding. These pillars are simply not strong enough in many laptops and break off.
Repair can be quite difficult. If you glue the plastic pillar back to the case it has to be positioned very precisely if it's not to be strained when you screw the hinge back to it. If possible, it's best to glue the pillar back to the case, still attached to the hinge, in order to position it accurately. Rapid setting two part epoxy glue is best, and once it's lightly secured, build up more epoxy around the break to reinforce it.
An alternative approach is given in this iFixit guide using wall plugs and multi-purpose or wood screws.
Cracked casing
If the laptop has been dropped the case may be cracked or broken. A cover or bezel or the clips that retain it may be broken, causing it to keep falling off. This may be challenging to repair properly. The simple, if somewhat inelegant solution is to secure it with sticky tape. Black PVC tape will probably match the case. Gaffer or Duct tape will be stronger.
If the strain of the hinge is causing the case to start to crack you can maybe build up a layer of reinforcement across the crack with epoxy glue, or glue a piece of an old circuit board (with the components removed!) across the crack.
In addition to epoxy, you may be able to find an inventive way of using thermoplastics for case repairs.
Replacing the screen
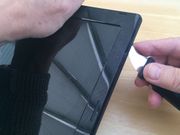
A laptop screen can get cracked though physical abuse, or may become faulty, for example showing horizontal or vertical bars across the screen. There are two options: either you can change just the LCD display panel or you can replace the entire laptop lid with a spare, probably taken from a scrap laptop of the same model. Which you choose may depend on availability of spares, ease of disassembly of the laptop, and whether the existing lid itself is damaged and in need of replacement.
Replacement of the the entire lid will require a fairly extensive disassembly, but don't be daunted! In addition to the screen data cable there may be another cable for the screen backlight, probably two for the WiFi antennae and another for the webcam, if fitted.
Replacing just the LCD panel may be easier. Typically there will be a couple of screws securing the bezel, with adhesive covers hiding their heads for cosmetic purposes. After removing these, the bezel can be unclipped from the shell of the lid using a prying tool. The screws holding the LCD panel in the shell will now be revealed, and removing these allows the panel to be carefully angled forwards enabling you to disconnect the data cable.
Replacing or upgrading the processor
In most traditional clamshell laptops the processor is in a socket rather than soldered to the motherboard, and in principle, can be fairly easily replaced. You might want to do that if you believe that a faulty processor is causing frequent crashes, though it would be hard to make that diagnosis with any level of confidence. You could perhaps fit a slightly faster processor to bring it up to the specification of a more powerful variant of the same model of laptop but it's doubtful whether the effort and expense would be worth the benefit.
The heat pipe and cooling grill are permanently attached to the heatsink, and this can be detached from the processor by removing the screws or clips that hold it in place. A lever or quarter-turn screw will then release the processor from its zero insertion force socket. It's critical that all the old heatsink paste is cleaned off and new applied exactly as recommended otherwise the processor is liable to overheat.
Reusing parts
If you're scrapping a laptop there are several parts that may be worth saving for reuse or repurposing.
RAM
It may well be worth saving the RAM for use to upgrade another laptop, though the older it is the less likely it is that you will ever find a use for it. Why not pool your RAM with your fellow repairers?
WiFi card
This might be worth saving if you are ever faced with a laptop which won't reliably connect to the owner's router.
Hard disk
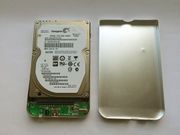
This is probably the easiest. For a modest sum you can obtain a USB enclosure for a hard disk allowing you to use it as an external USB disk for backup or offline storage. Having removed the hard disk from the laptop it will often still be in a laptop-specific carrier. This is removed simply by undoing two screws on each side. The hard disk will now fit directly in the new enclosure.
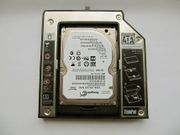
If you find that these days you hardly ever need a CD/DVD drive and could manage just as well with an external one, you may be able to get a caddy for a hard disk to fit in your CD/DVD drive bay. If you've upgraded your hard disk to an SSD with less capacity then you could use this to house your old hard disk. The heights of the of the drive bay, the caddy to fit it and the hard disk to go in it are the only important things to check.
CD/DVD drive
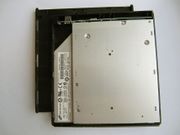
Similar USB enclosures can be obtained for a CD/DVD drive. Just as with a CD/DVD drive bay enclosure for a hard disk, you will need to ensure the height of the enclosure is sufficient for the CD/DVD drive. The drive will probably have a laptop-specific bezel which can be unclipped and replaced by one that comes with the enclosure.
CD/DVD drives often take more current than a USB socket will supply, and so the enclosure may have an extra USB lead to plug into a second USB socket for additional power.
Screen
If the laptop has a good high resolution screen it may be worth saving. You can obtain a controller for around £20 to turn it into an external monitor for your new laptop or to use with a Raspberry Pi. These controllers are often generic parts which the supplier must configure for your specific screen. The part number should be printed on the back of the screen and it's essential that you obtain a controller for that precise part number, including any suffixes or version numbers, otherwise there's a strong chance it won't work.
You can keep the screen in its existing laptop lid or make up a picture frame for it, and maybe laser-cut a box for the controller.
Alternatively, you can take the LCD assembly out and separate the LCD panel from the backlight. The backlight can then be used as a lightbox. With bigger screens such as flat screen TVs you can use the backlight for illumination. The way the light is concentrated in a direction perpendicular to the screen can give the impression of light coming through a window or skylight, as shown in this Youtube video.
Camera
If the laptop has a camera in the top of the screen, you may be able to make a USB webcam out of it. The camera chip itself is usually mounted on a small circuit board which also contains a USB interface chip. The cable connecting this through the hinge to the mainboard will contain 4 or 5 coloured wires, the colours typically being the same standard colors as a USB cable. All you have to do is match them up with the wires inside a scap USB cable, and you're done.
