Ja, u kunt uw laptop repareren!
Een laptop repareren is vaak niet zo eng als u denkt.
Samenvatting
De meeste traditionele dichtklapare laptops zijn relatief eenvoudig te demonteren en te repareren. Hoewel ze niet zoveel standaardonderdelen bevatten als een desktopcomputer, kunnen de meeste onderdelen worden vervangen of geupgraded.
Als u besluit dat een laptop niet meer te repareren is, is er misschien nog de mogelijkheid om enkele onderdelen te hergebruiken.
Helaas bieden nieuwere ultradunne laptops minder mogelijkheden, en sommige zijn vrijwel niet meer te repareren.
Veiligheid
- Maak een back-up van belangrijke gegevens voordat u begint. Het gaat niet vaak mis, maar waarom het risico nemen?
- Schakel de stroom uit en verwijder een door de gebruiker vervangbare batterij als die aanwezig is, voordat u met het werk begint.
- Overweeg of u antistatische voorzorgsmaatregelen moet nemen. Borstels en stofzuigers kunnen statische elektriciteit opwekken.
Voordat u begint
Voor alle taken, behalve de meest elementaire, is het eerste wat u moet doen zoeken naar een online reparatie- of demontagegids of -video. Een van de beste plaatsen om te zoeken is iFixit.com, maar een zoekmachine geeft ook andere. Veel laptops zijn er in verschillende varianten, dus als u uw exacte model niet kunt vinden, zoek dan in de gidsen naar het model dat er het dichtst bij ligt.
Het enige gereedschap dat u normaal gesproken nodig hebt is een set kleine schroevendraaiers en een wrikgereedschap - een gereedschap met een dun blad om de clips open te wrikken die de behuizing vaak bij elkaar houden. De iFixit Jimmy is ideaal. Een mes, bij voorkeur met een dun lemmet en een rond uiteinde en niet te scherp, volstaat als u niets anders heeft.
Voor de tussenliggende taken hebt u ook een middel nodig om de schroeven te organiseren. Pillendozen zijn een uitstekende keuze, maar eierdozen zijn ook goed. Noteer voor elk pillendoosje of eierdoosje uit welke demontagestap de schroeven komen. Je denkt dat je het wel onthoudt, maar geloof me, dat is niet zo!
Een andere goede oplossing is om de schroeven met Patafix op een vel papier te plakken. Zolang je maar de helft van het vel gebruikt, kun je het omvouwen om de schroeven redelijk veilig te houden als je het opzij moet leggen en later terug moet komen om de klus af te maken. Schrijf de demontage stap of waar de schroeven vandaan kwamen naast elke klodder Patafix. Als Patafix aan de schroefdraad kleeft, kunt u die bij de hermontage verwijderen door ze op een stukje schone Patafix te deppen; Patafix kleeft beter aan Patafix dan aan schroeven.
Soms vindt u pijlen tegen sommige schroeven aan de onderkant van een laptop of op een moederbord. Dit zijn de schroeven die u moet losdraaien; laat alle andere schroeven zitten, althans voorlopig.
Als de laptopkast niet uit elkaar wil, bedenk dan dat er altijd nog een schroef is! Als u hem bijvoorbeeld aan de linkerkant een centimeter of twee uit elkaar kunt halen, maar aan de rechterkant slechts een paar millimeter, dan zit de resterende schroef vrijwel zeker aan de rechterkant.
Bij de hermontage kan het soms gebeuren dat u bij een bepaalde stap meer gaten dan schroeven hebt. Dat komt omdat de andere gaten bedoeld zijn voor schroeven om de behuizing vast te zetten. Als je nu schroeven in die gaten zet, heb je later een probleem. Een goede demontagegids zal dit duidelijk maken.
Wat kunt u doen?
De constructie van traditionele clamshell-laptops is vergelijkbaar, hoewel u sommige van bovenaf en andere van onderaf opent. Modernere ultradunne en converteerbare laptops zijn meestal eenvoudiger van constructie, maar niet noodzakelijk gemakkelijker uit elkaar te halen. In het bijzonder:
- Sommige zijn aan elkaar gelijmd en bijna onmogelijk te repareren, terwijl bij andere gewoon het verwijderen van de achterkant toegang geeft tot het moederbord en de belangrijkste componenten.
- Batterijen kunnen meestal niet door de gebruiker worden vervangen, maar zijn ingebouwd. Ze zijn op maat gemaakt om in de laptopkast te passen en niet gemaakt van standaard cilindrische lithiumcellen.
- Het toetsenbord kan zijn ingebouwd in de bovenkant van de behuizing en het RAM-geheugen is rechtstreeks op het moederbord gesoldeerd, waardoor ze veel moeilijker te vervangen zijn.
De verschillende taken die u kunt uitvoeren zijn hieronder opgesomd, grofweg gegroepeerd naar moeilijkheidsgraad voor een typische clamshell laptop. Dat gezegd zijnde, wat gemakkelijk is op de ene laptop kan uitgebreide demontage vereisen op een andere, of vice versa.
Gemakkelijk
Batterij verwijderen of vervangen
Bij veel laptops kunt u de batterij eenvoudig verwijderen door een paar vergrendelingen los te maken. Vaak is er één veerbelast. Bij nieuwere ultradunne en converteerbare laptops moet u waarschijnlijk de achterkant van de behuizing verwijderen. Zoek een online gids die u laat zien hoe dat moet.
Helaas is het vinden van vervangende batterijen een mijnenveld. Originele batterijen van de fabrikant zijn vaak buitensporig duur, en als ze al enkele jaren op de plank liggen, kunnen ze al aan capaciteit verliezen. Aftermarket batterijen kunnen het geld wel of niet waard zijn en kunnen zelfs afkomstig zijn van afgedankte laptops. Sommige worden opnieuw gemaakt met nieuwe cellen, wat prima is zolang de slimme controller in de batterij is gereset. Voor het overige kan een middeldure batterij een goede keuze zijn. Om uzelf te beschermen:
- Controleer de garantieperiode en het retourbeleid van de verkoper.
- Controleer de reputatie van de verkoper en de ervaringen van andere kopers op onafhankelijke beoordelingssites zoals Trustpilot. Wees u ervan bewust dat gunstige beoordelingen kunnen worden gekocht.
- Controleer bij aankomst van de batterij of u een garantie moet registreren om deze geldig te laten zijn, hoewel dit volgens het consumentenrecht niet nodig zou moeten zijn.
Batterijen voor ultradunne en converteerbare laptops zijn moeilijker te vervangen en mogelijk moeilijker te verkrijgen.
RAM vervangen of upgraden
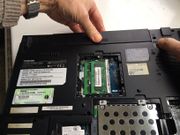
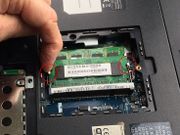
Het upgraden van uw RAM (hoofdwerkgeheugen) is waarschijnlijk de gemakkelijkste upgrade die u kunt doen, en tegelijkertijd vaak een van de meest effectieve. U kunt meestal bij de RAM-sleuven komen door eenvoudigweg een serviceklep op de basis te verwijderen. Twee clips, één aan elke kant, houden elke geheugenmodule in zijn sleuf. Bij vervanging moet u ervoor zorgen dat de geheugenmodule zo ver mogelijk in de connector zit voordat u hem naar beneden draait om de clips vast te zetten.
Als uw laptop een 32-bits processor heeft of een 32-bits versie van Windows gebruikt en minder dan 4GB RAM heeft, dan is upgraden naar 4GB (het maximum dat hij kan gebruiken) over het algemeen de moeite waard en relatief goedkoop.
(Als u niet zeker weet of uw laptop 32 of 64 bits is, druk dan op de Windows-toets en "R" en typ msinfo32. Druk op Return. U krijgt dan een volledig overzicht van de bronnen van uw computer.)
Een 64-bits laptop upgraden naar meer dan 4GB kan de moeite waard zijn, vooral als u aan grafische, video- of audiobewerking doet, of vaak veel browsertabbladen open hebt staan.
Vervanging van een beschadigd of defect toetsenbord
Veel mensen nemen genoegen met een beschadigd of onbetrouwbaar toetsenbord zonder te beseffen hoe goedkoop en eenvoudig het te vervangen is.
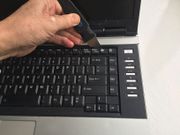
Zoek naar een online gids. Meestal hoeft u alleen maar een reeks vergrendelingen langs één lange kant van het toetsenbord los te maken om het eruit te halen. Een lintkabel verbindt het nog steeds met het moederbord, en u kunt deze losmaken door voorzichtig een klembalk op te tillen of los te maken.
Bij sommige laptops wordt het toetsenbord bovendien op zijn plaats gehouden door een of meer schroeven die u van de onderkant van de behuizing moet losdraaien, of verborgen onder een opklikbare rand tussen het toetsenbord en het scherm. Bij andere is het toetsenbord geïntegreerd in de bovenkant van de behuizing, maar nog steeds niet zo moeilijk te verwijderen.
Vervangende toetsenborden voor de meeste laptopmodellen zijn online verkrijgbaar voor ongeveer 25 euro. Zorg ervoor dat u er een krijgt voor uw exacte model. Zorg er ook voor dat u er een krijgt met de juiste nationale toetsenbordindeling, anders vindt u sommige toetsen op onbekende plaatsen.
Harde schijf vervangen of upgraden
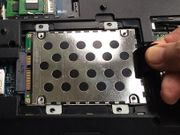
Heel vaak kunt u de harde schijf bereiken door simpelweg een servicekap op de basis te verwijderen. Bij sommige laptops, vooral die voor consumenten, kan een eerste demontage nodig zijn.
Het vervangen van een harde schijf door een solid state schijf is waarschijnlijk de meest effectieve manier om een oude laptop nieuw leven in te blazen. Maar als hij traag werkt door ongewenste software, pop-ups of virussen, dan moet u die eerst aanpakken.
Als u opslagruimte tekort komt, kunt u gemakkelijk een grotere harde schijf plaatsen. Harde schijven voor laptops zijn sterk gestandaardiseerd in grootte, hoewel ze in verschillende hoogtes verkrijgbaar zijn. Als u er een met een hogere capaciteit plaatst, controleer dan of deze niet dikker is dan de oude.
If you're happy to reinstall your operating system on your new disk then that's the easiest way to go. To copy your existing system you will need appropriate disk cloning software. Copying a hard disk to a smaller SSD requires an extra step to shrink the file system.
CD/DVD drive replacement
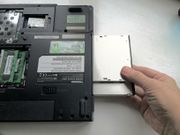
A faulty CD/DVD drive is easily replaced, or you might wish to replace it with a better one, or a Blu-ray drive. They are all a standard size, but come in a couple of different heights.
The CD/DVD drive normally just slides into the laptop shell, but it's retained by a screw at the back, somewhere around the middle of the laptop. Quite often you will be able to remove this screw with no more disassembly than removing the service cover on the bottom.
The drive will usually have a bezel which is shaped and styled to match the laptop, and this can be unclipped and transferred to a new drive.
Just a little harder
Replacing the WiFi adapter
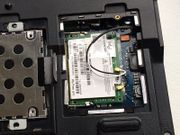
WiFi is supposed to be standardised, but nevertheless a particular brand of adapter will sometimes refuse to work reliably with a particular router. The WiFi adapter is often a small easily replaceable board.
It may be very easily accessible along with the RAM and the hard disk under a service cover on the bottom of the case. Gently lift off the two antenna connectors and remove one or two screws holding it in place, then remove the adapter from the socket it fits in, which similar to a RAM socket but smaller.
On some laptops the WiFi adapter may not be quite so easily accessed, requiring a first level of disassembly.
Cleaning the fan
After a few years it's very common for the fan (or more usually the cooling fins) to get clogged with matted dust. This will cause the laptop to overheat, the fan to run continuously and perhaps noisily, and may cause the laptop to crash.
Cleaning the fan is not difficult but usually requires fairly extensive disassembly of the laptop, which may be daunting. Don't be put off. Given a good disassembly guide, this is perfectly doable.
Replacing the power connector
A damaged power connector which no longer connects reliably is not uncommon. In many cases it's replaceable. As with cleaning the fan, this is likely to require fairly extensive disassembly but often, the power connector itself is easily removed from the case and simply plugs into the motherboard via a flying lead.
If you're unlucky you may find the power connector is soldered directly to the motherboard, in which case you will need to be confident with a soldering iron to replace it. Or you might find the problem is that the laptop case is broken around the power connector so that you can't push the plug fully home.
Replacing the backup battery
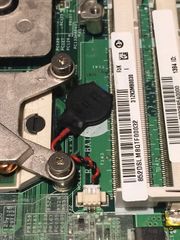
All laptops contain a small backup battery, often (for historical reasons) erroneously called the CMOS battery. This keeps the clock running when neither mains power nor a main battery are present. (Removing this battery will not reset the BIOS settings and BIOS password as sometimes thought. These have been held in flash memory similar to a memory stick in all computers since about the 1990's.)
This battery is usually a non-rechargeable lithium coin cell, or sometimes a rechargeable nickel battery in a plastic sleeve. Either way it may fail after maybe 10 years or more causing the computer to lose its time and date on loss of power. If you're lucky, it will be on a flying lead connected to the motherboard via a miniature plug and socket, or it might be a coin cell in a socket. Otherwise it could be soldered in and a certain level of disassembly may be required to access it. If you can't get hold of an identical replacement, provided it's the same voltage and the same chemistry it should be fine. If you need to improvise at all, make sure you get a "tagged" battery having tags spot-welded to it which you can solder to. It's not possible to solder directly to a battery of any type without damaging it.
More difficult
Fixing a broken hinge
A broken laptop hinge is a very common problem. Unfortunately it's nearly always the plastic the hinge is attached to that is broken rather than the hinge itself. The hinge screws usually screw into brass bushes set in plastic pillars which are part of the case moulding. These pillars are simply not strong enough in many laptops and break off.
Repair can be quite difficult. If you glue the plastic pillar back to the case it has to be positioned very precisely if it's not to be strained when you screw the hinge back to it. If possible, it's best to glue the pillar back to the case, still attached to the hinge, in order to position it accurately. Rapid setting two part epoxy glue is best, and once it's lightly secured, build up more epoxy around the break to reinforce it.
An alternative approach is given in this iFixit guide using wall plugs and multi-purpose or wood screws.
Cracked casing
If the laptop has been dropped the case may be cracked or broken. A cover or bezel or the clips that retain it may be broken, causing it to keep falling off. This may be challenging to repair properly. The simple, if somewhat inelegant solution is to secure it with sticky tape. Black PVC tape will probably match the case. Gaffer or Duct tape will be stronger.
If the strain of the hinge is causing the case to start to crack you can maybe build up a layer of reinforcement across the crack with epoxy glue, or glue a piece of an old circuit board (with the components removed!) across the crack.
In addition to epoxy, you may be able to find an inventive way of using thermoplastics for case repairs.
Replacing the screen
A laptop screen can get cracked though physical abuse, or may become faulty, for example showing horizontal or vertical bars across the screen. There are two options: either you can change just the LCD display panel or you can replace the entire laptop lid with a spare, probably taken from a scrap laptop of the same model. Which you choose may depend on availability of spares, ease of disassembly of the laptop, and whether the existing lid itself is damaged and in need of replacement.
Replacement of the the entire lid will require a fairly extensive disassembly, but don't be daunted! In addition to the screen data cable there may be another cable for the screen backlight, probably two for the WiFi antennae and another for the webcam, if fitted.
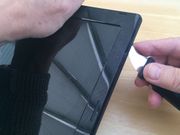
Replacing just the LCD panel may be easier. Typically there will be a couple of screws securing the bezel, with adhesive covers hiding their heads for cosmetic purposes. After removing these, the bezel can be unclipped from the shell of the lid using a prying tool. The screws holding the LCD panel in the shell will now be revealed, and removing these allows the panel to be carefully angled forwards enabling you to disconnect the data cable.
Replacing or upgrading the processor
In most traditional clamshell laptops the processor is in a socket rather than soldered to the motherboard, and in principle, can be fairly easily replaced. You might want to do that if you believe that a faulty processor is causing frequent crashes, though it would be hard to make that diagnosis with any level of confidence. You could perhaps fit a slightly faster processor to bring it up to the specification of a more powerful variant of the same model of laptop but it's doubtful whether the effort and expense would be worth the benefit.
The heat pipe and cooling grill are permanently attached to the heatsink, and this can be detached from the processor by removing the screws or clips that hold it in place. A lever or quarter-turn screw will then release the processor from its zero insertion force socket. It's critical that all the old heatsink paste is cleaned off and new applied exactly as recommended otherwise the processor is liable to overheat.
Reusing parts
If you're scrapping a laptop there are several parts that may be worth saving for reuse or repurposing.
RAM
It may well be worth saving the RAM for use to upgrade another laptop, though the older it is the less likely it is that you will ever find a use for it. Why not pool your RAM with your fellow repairers?
WiFi card
This might be worth saving if you are ever faced with a laptop which won't reliably connect to the owner's router.
Hard disk
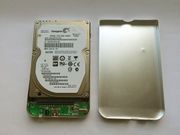
This is probably the easiest. For a modest sum you can obtain a USB enclosure for a hard disk allowing you to use it as an external USB disk for backup or offline storage. Having removed the hard disk from the laptop it will often still be in a laptop-specific carrier. This is removed simply by undoing two screws on each side. The hard disk will now fit directly in the new enclosure.
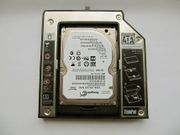
If you find that these days you hardly ever need a CD/DVD drive and could manage just as well with an external one, you may be able to get a caddy for a hard disk to fit in your CD/DVD drive bay. If you've upgraded your hard disk to an SSD with less capacity then you could use this to house your old hard disk. The heights of the of the drive bay, the caddy to fit it and the hard disk to go in it are the only important things to check.
CD/DVD drive
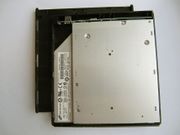
Similar USB enclosures can be obtained for a CD/DVD drive. Just as with a CD/DVD drive bay enclosure for a hard disk, you will need to ensure the height of the enclosure is sufficient for the CD/DVD drive. The drive will probably have a laptop-specific bezel which can be unclipped and replaced by one that comes with the enclosure.
CD/DVD drives often take more current than a USB socket will supply, and so the enclosure may have an extra USB lead to plug into a second USB socket for additional power.
Screen
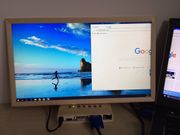
If the laptop has a good high resolution screen it may be worth saving. You can obtain a controller for around £20 to turn it into an external monitor for your new laptop or to use with a Raspberry Pi. These controllers are often generic parts which the supplier must configure for your specific screen. The part number should be printed on the back of the screen and it's essential that you obtain a controller for that precise part number, including any suffixes or version numbers, otherwise there's a strong chance it won't work.
You can keep the screen in its existing laptop lid or make up a picture frame for it, and maybe laser-cut a box for the controller.
Alternatively, you can take the LCD assembly out and separate the LCD panel from the backlight. The backlight can then be used as a lightbox. With bigger screens such as flat screen TVs you can use the backlight for illumination. The way the light is concentrated in a direction perpendicular to the screen can give the impression of light coming through a window or skylight, as shown in this Youtube video.
Camera
If the laptop has a camera in the top of the screen, you may be able to make a USB webcam out of it. The camera chip itself is usually mounted on a small circuit board which also contains a USB interface chip. The cable connecting this through the hinge to the mainboard will contain 4 or 5 coloured wires, the colours typically being the same standard colors as a USB cable. All you have to do is match them up with the wires inside a scap USB cable, and you're done.
