Projectors
With a basic understanding of how data projectors work there are various things you can do to bring one back to life.
Summary
Data projectors are often quite expensive items and so well worth fixing when they go wrong. With care, disassembly and fixing are not generally too difficult, but an understanding of their principles will help.
First, check the instructions for any fault condition indicated by the lights. Bulbs are easily replaced, but you must take great care not to touch the glass, or any of the optical surfaces. Unbranded or third party replacement bulbs can save a lot of money. Clogged air filters and faulty fans are quite easily dealt with. Look out for a thermal fuse that may have blown as a result of overheating. A faulty colour wheel should be replaceable though somewhat more extensive disassembly may be required.
Safety
- Projector lamps get extremely hot. Always leave a projector to cool down for 30 - 45 minutes before working on it, so as to avoid the risk of burns.
- Take great care not to touch any of the glass of a projector lamp as finger grease can shorten its life, and in the worst case, cause it to explode.
How projectors work
There are two basic types of projector: DLP and LCD. Except for pocket-size projectors, they almost invariably use a metal halide discharge tube as the light source.
DLP projectors
DLP (Digital Light Processing) projectors are probably the commonest. The image is created by a digital micromirror device (DMD) fabricated on a silicon chip. Each pixel is controlled by a tiny mirror which can be electrically deflected to reflect light either through the lens and on to the screen, or into a "light sink" where it is absorbed. By oscillating between the two states at high speed and spending more or less time in one state than the other, the apparent brightness of the pixel can be controlled.
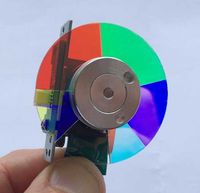
The DMD is essentially a monochrome device. A colour image is produced by a colour wheel (as illustrated) in front of the lamp. This passes each of the three primary colours in turn. An optical sensor detects a mark on the hub of the wheel in order to determine the rotational position of the wheel. Synchronised with the output of this sensor, the DMD then creates each of the red, green and blue fractions of the image, one after the other. If you sweep your gaze rapidly across the screen you may see the red, green and blue images separating. Some people find this distracting, and it is sometimes cited as a disadvantage of DLP projectors.
In passing only one colour at a time the colour wheel rejects two thirds of the light from the lamp. High end home theatre and event projectors sometimes have 3 DMD chips. The light from the lamp is split into red, green and blue beams using dichroic mirrors, each of which transmits one of the three primary colours and reflects the other two (or vice versa). The three beams are focussed onto the 3 DMD chips before being recombined, again with dichroic mirrors, into a colour image for projection onto the screen.
LCD projectors
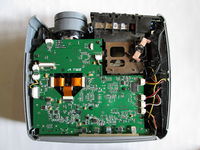
These typically have 3 LCD modules, and as in high end DLP projectors, the light from the lamp is split into red, green and blue beams, which are focussed on the 3 LCDs before being recombined. When you take the lid off you may be able to see 3 identical ribbon cables at 90 degrees descending from the main logic board to the 3 LCD modules.
Lamps
In the last few years, a range of pocket projectors has appeared which use LEDs as the light source, but these have a limited brilliance making them unsuitable for projecting more than quite a small image for a very small audience. This may change in the coming years. LEDs intrinsically have a very long lifetime, but they are likely to be operating towards the limit of their power capability which may reduce their life or result in elevated failure rates. An LED projector will typically have separate red, green and blue LEDs activated in turn to produce a colour image. This eliminates the need for a colour wheel.
Virtually all other projectors use a metal halide or xenon discharge tube as the light source. These lamps run extremely hot and have a life of only a few thousand hours. However, the rated life tends to assume that it's used in long stretches at a time, and the actual life may be considerably shorter if the projector is only used for an hour or so at a time.
These lamps take a minute or so to reach operating temperature and full light output. They require a high voltage to initially strike the discharge but thereafter they run at a much lower voltage. However, the striking voltage is significantly higher still if you try and switch them on while still hot from previous use, and in this situation a projector may have to automatically retry several times in order to strike the discharge.
Diagnosis and fixing
Data projectors often have one or more status LEDs which light or flash in different combinations or sequences under different fault conditions. These should be listed in a user or service manual. Checking this may well give you a good lead as to what the fault is. Many projectors also have network, USB and serial ports (or some combination). The handbook should tell you how to connect a computer to one of these, by which you may get more detailed diagnostic information.
Many of the same problems as are found in any electronic equipment can affect a projector. If the projector is completely dead or the LEDs don't help, signs of burnt or overheated components or bulging electrolytic capacitors may lead you to the problem. The power supply in a projector has to supply more power than in many other types of electronic equipment, subjecting it to greater stress.
Mechanical faults
In a DLP projector, the colour wheel may fail due to a worn or dry bearing. Indicator lights may specifically indicate a colour wheel problem, or you may hear the colour wheel trying to spin up and then stop, perhaps repeatedly, or the image may flicker different colours, or the projector may just refuse to start up. The bearing may be virtually impossible to get at, but if it is, you could try lubricating it with a tiny drop of sewing machine oil. Failing that, it should be possible to source a replacement wheel online, but having found what seems to be a suitable one it may be worth taking a photo of the original and sending it to the seller to ensure the replacement is identical.
There is likely to be an interlock to prevent lamp power being applied without the lamp cover in place, and this could develop a mechanical or electrical fault.
Dust or other forms of contamination can be sucked into the projector by the fan. If this lands on any of the optical surfaces it may cause blurry shadows on the projected image. Clean off with great care as it is easy to make things worse, and any finger marks may not be easy to remove. Optical surfaces will have an anti-reflective coating which could be damaged by unsuitable solvents or cleaning agents, and the coloured coatings on a colour wheel of a DLP projector or the colour separation filters of an LCD projector may similarly be damaged.
Overheating
Fans can sometimes fail and can be replaced, and air filters (if fitted) can get clogged and need cleaning. Such problems may have resulted in the projector overheating. In removing dust from a fan or a filter (or elsewhere) take care you don't transfer any of it to optical components.
A lamp coming to the end of its life can run excessively hot and this can be another cause overheating. There may be a thermal cut-out switch which may have tripped as a result of either type of fault.
Lamp replacement
The lamp is usually user-replaceable, with instructions for doing so in the user handbook. Take great care not to touch any glass parts. Often, you will need to remove the lamp as one of the first stages of disassembly. Place it in a clean polythene bag to protect it from dust or finger marks. You should do the same with any other optical components you remove.
Replacement projector lamps can be expensive, often several hundred pounds. Generally, there is a choice of several options. The branded replacement offered by the manufacturer is likely to be the most reliable and trouble free, and would be the professional choice but at a premium price.
An unbranded alternative may be available, identical in every way except for the markings, and possibly even coming from the same factory. This will offer a considerable saving.
Still cheaper third party alternatives may be available, built to the same specification or re-manufactured with a new discharge tube in a recycled housing. They may even offer an increased life as compared to the branded alternative, by using a higher specification discharge tube.
Finally, you can often obtain a replacement bare discharge tube and fit it to the old lamp housing, offering the cheapest alternative. However, you need to take extreme care to avoid touching the glass, which may not be easy as you juggle the parts to reassemble the housing.
If you go for one of the cheaper alternatives it's a good idea to make sure you "burn in" the replacement while still within the returns period. You could do this, for example, by running it for 10 hour-long sessions and letting it cool completely between sessions.
External links
Consult Projectors at:
iFixit

