Toasters
This page covers diagnosis and repair of pop-up toasters.
Summary
A toaster can give many years of service but modern ones are not always as reliable as you might wish. The first thing to do is to empty out the toast crumbs, which might be interfering with the mechanism. Spare parts are available for a few of the better quality brands, but on others, following a logical process may lead you to a simple problem that can be fixed.
Safety Warnings
- Live mains may be exposed when the cover is off. Take the usual precautions, in particular:
- Double-check it's not still plugged in when you open it
- Never poke anything into the toast slots if it's plugged in
- Parts may remain very hot for a while after switching off.
- Live mains may be exposed when the cover is off. Take the usual precautions, in particular:
Principles of operation
All pop-up toasters have 2 or more slots into which the toast is lowered by pressing down a lever against a spring. This action switches on the electrical heater elements positioned either side of the toast slots. An electromechanical or electronic timing mechanism pops up the toast and switches off the heater after a length of time determined by the browning control. Additional controls may optionally allow this time to be modified for toasting frozen bread or reheating toast etc. and LEDs may show that the toaster is on and options selected.
In the oldest toasters the lever is held down at the bottom of its travel by a catch. A bimetallic strip positioned close to the toast heats up along with the toast and bends as it does so, due to the different expansion coefficients of the two metals it's made of. When it reaches a certain temperature it closes an electrical contact, energising a small electromagnet which releases the catch. This causes the spring to pop the toast up.
In more modern toasters there is no catch or bimetallic strip, instead the lever is held down against the spring by an electromagnet, somewhat larger than the one in the previous type of toaster. This is energised along with the element, but the current is interrupted after a pre-set time by a timing mechanism causing the toast to pop up.
There are several types of timing mechanism.
Some toasters have a clockwork timing mechanism, similar to an old fashioned kitchen timer. In others it's electronic. There are different types of electronic timer.
The older ones use common off-the-shelf electronic components such as 4000 series integrated circuits. One such type uses an oscillator and a binary counter (an integrated circuit) which counts the oscillations and terminates the timing cycle when the counter reaches its maximum value. The time this takes depends on the oscillator frequency. A control adjusts this frequency and hence the toasting time. A commonly used binary counter is a 16 pin integrated circuit marked 4060 (with prefix and/or suffix depending on the manufacturer). Replacements are available on eBay. However, you should also test any transistors and other components on the same circuit board as one of these could equally well have failed.
More modern toasters use a microcontroller to perform the timing function, interfacing to a set of push buttons and LEDs or other controls with which to set the desired toasting time. Even though the microcontroller might be a standard type, it's very unlikely that you would be able to program a replacement with the right firmware.
Electronic timers of whatever type require a low voltage DC supply in order to operate. This is often supplied from a third connection to the element. If this is placed, say, a twentieth of the way along the element it will tap off a twentieth of the mains voltage, which would be 240 / 20 = 12V. It must still be rectified, smoothed and (usually) regulated before it can be used by the electronic circuits (see Power supplies for further details).
Disassembly
Before starting, empty the crumbs from the crumb tray in the bottom of the toaster, preferably outside - the birds will enjoy them.
The cover is usually secured by screws in the bottom of the toaster. You will probably have to remove the lever and a control knob before you can lift the cover off. If there are no visible screws securing them they are probably a tight (or very tight) push fit. As you remove the cover take care of the timer and pop-up mechanisms and wires which you might strain in the process. If any further disassembly is required it should now be possible to see how to do it.
Diagnosis
Preliminaries
If the toaster is completely dead, check the fuse in the plug before going any further. If it has blown, consider whether this might be due to a fault which could make the toaster dangerous.
The first thing to check after opening the toaster is whether there are any crumbs or fragments of bread interfering with the mechanism. A good clean will do no harm even if this isn't the problem, but be careful around the element, which you could break.
A tiny drop or smear of oil on the lever mechanism can make it operate more smoothly, but take care to wipe up any excess.
Recognising the parts
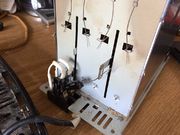
After removing the outer case you should be able to identify the main switch contacts, which are closed by pressing down the lever which lowers the toast into the toaster. (First picture on the left.) The mains supply from the plug comes into one side of this switch, and the other side is wired to the element. If the element doesn't get hot you can use a multimeter to check continuity through the switch with the lever pressed down.
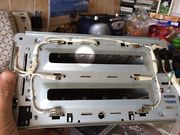
Underneath the toaster you should be able to follow the wiring from the switch, through each heating element, and back to the switch. If the element doesn't get hot you can test each section of the element with a multimeter on a resistance range. Each section should read a few tens of ohms. All sections of the element together have the full mains voltage across them (240V), and a fraction of this, maybe 5%, is drawn off by a tap at 5% of the way along the element. In the photo on the right you can see a rivet (highlighted) from which a connection (hidden) on the other side of the element takes the low voltage to the electronic timer.
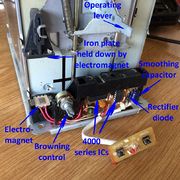
The controls are shown labelled in the photo on the left. Locate the wires which bring the power into the timer board and use a multimeter on a resistance range to check there is continuity between one of them and the tap on the element, and the other and one end of the element.
Check the resistance of the electromagnet using a multimeter on a resistance range. A value of a few hundred ohms would be reasonable. If a visual inspection reveals no signs of overheating check any other components you can (see Basic electronic components and Active components.)
Toast won't stay down
A common fault is that the lever won't stay down. In older types of toaster where it's held down by a catch, this will be a mechanical problem.
In a more modern toaster, it's likely to be a problem with the electronic timer, or the electromagnet, or the tap on the element which draws off the low voltage. But if the element doesn't heat up when you hold the lever down it may just be the contacts which switch the power to it, or the fuse, or some other electrical problem.
Toast won't pop up
Sometimes there may be a problem with the pop-up spring. If it's broken, dislodged or something is interfering with its movement you will be unable to feel its tension as you push the lever down, and it probably won't pop up. These are purely mechanical problems. In some older toasters the spring consists of a coiled up phosphor-bronze strip which uncoils as the lever is pressed down, and can snap with age. A spare spring may be obtainable.
Timer problems
Problems with an electronic timer are not easily fixed unless you have the luxury of an identical toaster with a different fault from which you can take a good timer. If there are obvious signs of a burnt out component you may be able to replace it, otherwise you will need an understanding of electronics to get any further.
First, you could check the components generating the low voltage DC for the electronics. Look for, and if possible test the rectifier diode (there may be 4 of them) and the smoothing capacitor. See Power supplies for principles of operation.
Older electronic controls may use standard components. Look for any integrated circuits with type numbers which can be identified by an Internet search. Replacements for counter-timer (and other) integrated circuits such as CD4060B or CD4536B should be obtainable. In the case of a microcontroller-based timer, even if you could find a replacement it's extremely unlikely that you could obtain the firmware to program it with.
Element doesn't get hot
If the handle stays down but the element doesn't get hot then you probably have a broken element. If the break isn't obvious, follow the wiring and check the element or each section of it with a multimeter on an ohms range. The total resistance for a 750W toaster should be around 75 Ohms when hot, though substantially less when cold. Replacement elements are available for some of the higher quality brands. For others, it may be possible to bridge a break in the element with a piece of copper wire crimped to the element either side of the break, as demonstrated in this video: Florine's Toaster (French, with English subtitles).


